


MATERIALS
USED
Worsted
Weight Yard
Crochet
Hook - G/6-4.25MM
Color A: Red Heart Super Saver - Buff
Tapestry/Yarn
Needle
Color B: Red Heart Super Saver - Aran
Scissors
Color C: Red Heart Super Saver - Red
GAUGE: Not Important,
this pattern uses the size chat at the end of the pattern to achieve the size
hat you desire.
ABBREVIATIONS
& STITCHES
|
||
blo
= back loop only
|
sc
= single crochet
|
|
ch
= chain
|
st(s)
= stitch(es)
|
|
RS
= right side
|
WS
= wrong side
|
|
NOTES
FOR HAT
|
1.
This hat can be made for any size from a preemie
to an adult male.
You will need to make your crown the circumference and height of the person you are making the hat for. |
2.
Check the chart at the bottom of the pattern for
the circumferences
and heights for different ages of individuals. Then, fill in the information you need below. |
a.
_____ Circumference of Head
|
b.
_____ Circumference For Hat
|
c.
_____ Height of Hat
|
3.
To make measuring the hat easier:
|
a. cut a piece of yarn in one color the length of the
circumference of the hat. |
b.
Cut another piece of yarn, in a different color,
the
length of the height you need. |
4.
Do not fasten off. Carry un-used color until the next
use.
|
5.
HINT:
To get a GREAT size match, use Styrofoam balls with the
circumference of the head you want to fit. This works SO MUCH BETTER than measuring in inches. |
SET
UP FOR HAT
|
Row 1 (RS): Make a chain
equal to, or close to, the height
needed, sc in 2nd ch from hook and in each ch to the end, ch 1, turn. |
Row 2 (WS): Sc in blo of
each st but stop 5 sts before the
end, ch 1, turn. |
Row 3: Sc in blo of
each st to the end, ch 1, turn.
|
Row 4: Sc in blo of
each st to the end of row 2, then sc
in the remaining sts remaining on Row 1, ch 1, turn. |
PATTERN
for REMAINDER OF HAT
|
Row 5: Sc in blo of
each st to the end, ch 1, turn.
|
Row 6: Sc in blo of
each st but stop 5 sts before the end,
ch 1, turn. |
Row 7: Sc in blo of
each st to the end, ch 1, turn.
|
Row 8: Sc in blo of
each st to the end of row 2, then sc in
the remaining sts on Row 1, ch 1, turn. |
REPEAT
Rows 5 - Row 8
until your hat reaches the
circumference needed. |
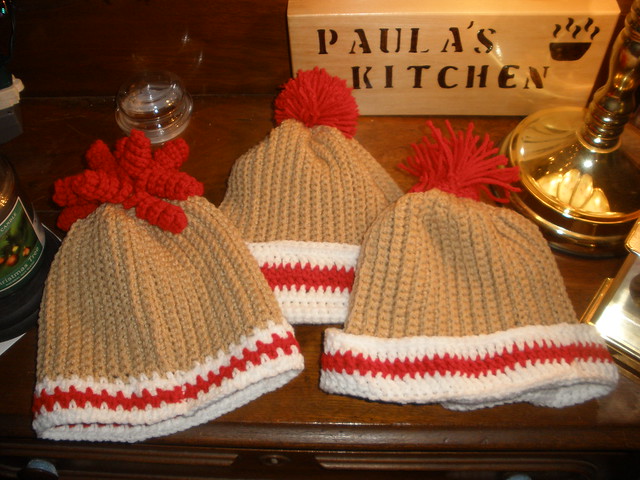
BRIMS - With RS facing
and bottom edge upward,
attach yarn A to the top of the row furthest to the right (remember, this is the actual bottom of the hat.) |
ADULT (in the middle of the picture) and BABY (on the right in the picture.) |
Row
1: Ch
1, sc in same st, *ch 1, sk 1, sc in next row,* repeat from
* to * across, ch 1, turn. |
Row
2:
Sc in same st, sc in next sp, *ch 1, sk 1, sc in next row,*
repeat from * to * across, ch 1, turn. |
Row
3: Sc
in each sc and sp across, ch 1, turn.
|
Row
4:
Sc in each st across, ch 1, turn.
|
Row
5: Sc
in same st and in the BL of each sc across, ch 1, turn.
|
Rows
6-7: Repeat
Rows 1-2.
|
Rows
8-9: Join
Yarn C and repeat Rows 1-2, fasten off.
|
Rows
10-11: Rejoin
yarn A and repeat Rows 1-2. fasten off.
|
GIRLS (shown on the left
in the photo.)
|
Row
1: Ch
1, sc in same st, *ch 1, sk 1, sc in next row,* repeat
from * to * across, ch 1, turn. |
Row
2:
Sc in same st, sc in next sp, *ch 1, sk 1, sc in next row,*
repeat from * to * across, ch 1, turn. |
Rows
3-4: Join
Yarn C and repeat Rows 1-2, fasten off.
|
Rows
5-6: Rejoin
yarn A and repeat Rows 1-2. fasten off.
|
TOP
DECORATION: using yarn C
|
ADULT (in the
middle of the picture)
|
Add
a pom-pom after joining sides and gathering top.
|
BABY (on
the right in the picture.)
|
1.
Cut one 5 inch piece of yarn for
every other row, fold in half.
|
2.
Pull yarn through every other row as
if you were making fringe.
|
GIRLS
Banana Curls (shown on the left in the photo.)
|
With
RS facing and top edge upward, attach yarn C to
the
top of the row furthest to the right. |
1.
Ch 16, 3 sc in 3rd ch from hook.
|
2.
Make 3 sc in each ch to base.
|
3.
Sl st into the same row, sc in the
end of the next row.
|
4.
Sc in the next row,
|
5.
Repeat Steps 1 - 4 until you have
finished with the last row.
|
LOOPIES
(not shown)
|
Baby
- Ch 30, twist the ch as tightly as possible then to next Row of pattern.
|
Toddler
- Ch 40, twist the ch as tightly as possible then to next Row of pattern.
|
Child
- Ch 50, twist the ch as tightly as possible then to next Row of pattern.
|
Adult
- Ch 60, twist the ch as tightly as possible then continue to next Row of
pattern..
|
FINISHING
|
With
wrong sides together, sc beginning and end rows together,
fasten off and weave in end on wrong side. |
Sock Monkey Sock Hat
|
||||
MEASUREMENTS
FOR HATS
|
||||
Head Circumference
|
Circumference of Hat
|
Diameter of Hat
|
Height of Hat
|
|
Preemies
|
||||
1-2
pounds
|
9” – 10”
|
7
½” – 8”
|
2
½”
|
3
½” – 4”
|
2 – 3 pounds
|
10” – 11 ¼”
|
8 ½” – 10”
|
2
½” - 3”
|
4”
|
4-5
pounds
|
11
½” - 12 ½”
|
9”
– 11 ½”
|
3”
- 3 ½”
|
4”
– 4 ½
|
5 ½ - 6 pounds
|
12 ½” – 13”
|
11” – 12”
|
3
½” - 3 ¾”
|
5” – 5 ½
|
Newborns
|
13”
– 14”
|
11”
– 13”
|
3
¾” - 4”
|
5”
– 5 ½
|
3 – 6 months
|
14” – 17”
|
12”
– 15”
|
4”
- 4 ¾”
|
6 ½” - 7
|
6
– 12 months
|
16”
– 19”
|
14”
– 18”
|
4
¾” - 5 ¾”
|
7
½”
|
12 months – 3 years
|
18” – 20”
|
16”
– 19”
|
5
¾” - 6”
|
8”
|
3
– 10 years
|
19”
– 20 ½”
|
17”–
19 ½ ”
|
6” – 6 ¼”
|
8
½”
|
Pre-teens and teens
|
20 ½” – 22”
|
18
½ ” – 21”
|
6¼”
– 6 ¾”
|
9” –10”
|
Adult
Women
|
21
½” - 22 ½”
|
19
½ ” – 21 ½ ”
|
6
¾” – 7”
|
11”
|
Adult Men
|
23” – 24”
|
22”
– 23”
|
7”
– 7 ¼”
|
11” – 11 ½”
|

I love these, Paula! Nice pattern. Thanks for sharing.
ReplyDeleteThank you for this pattern! It's motivation for me to finish my first sock monkey.
ReplyDeleteWooow! Just found this beautiful hats, great job! They look so wonderful, especially in this yummy caramel color. Thanks for sharing the pattern! Have a great weekend :-))
ReplyDeleteExcellent article. Very interesting to read. I really love to read such a nice article. Thanks! keep rocking. homeschooling
ReplyDelete