Moi? Her favorite aunt . . . and s-h-h-h-h-h, don't tell anyone, I am her only aunt. Now, if we go to aunts and great-aunts she has my Aunt Ruth . . . and she deserves to be the favorite. She is the matriarch of our family.
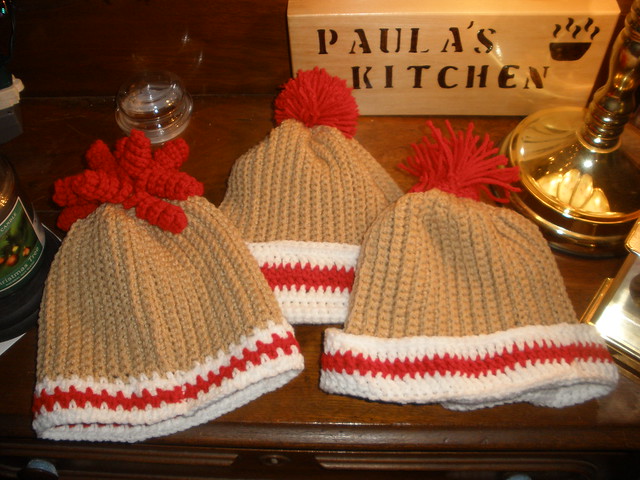
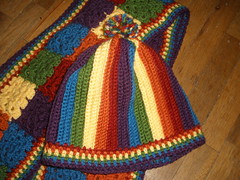
But, I digress . . . here is what the scarf and hat ended up looking like. I like them a lot, but I am going to replace the pom-pom with a bigger one. This one is out of proportion . . but I wanted the picture so you get what I had.
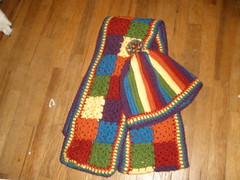
Scarf
Square Size: 3" x 3"
Border depth: 1"
Materials
Yarn: Worsted Weight
Vanna's Choice colors used in sample:
A. Scarlet
B. Terracotta
C. Duckie (Vanna Baby Yarn)
D. Kelly Green
E. Sapphire
F. Eggplant
Crochet Hook: F/5 3.75mm
Tapestry/Yarn Needle
NOTES:
- Each row is made of twenty-eight squares.
- Once the 1st square is complete, the next squares are joined as you go.
- When making the second row, the 1st square will be joined to the first square of the first row.
- The 2nd square in the second row will be joined to the 1st square in that row AND the 2nd square of the first row.
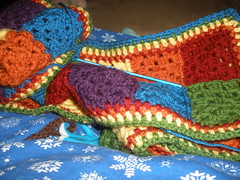
- The method I am going to teach you allows you to join the granny squares as you make them . . . no waiting until you have all of the squares done to join them.
- Your squares are done in sequence: A-F then repeat until you have reached the length you want. I made 28 squares per row but you may increase or decrease at your will.
Abbreviations
ch(s) – chain(s)
dc(s) – double crochet(s)
PU – Pick Up
sl st(s) – slip stitch(es)
sp(s) – space(s)
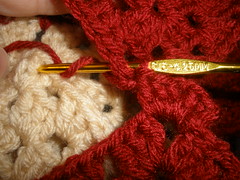
 |
| Starting the 4th round (blue) of the border. |
written directions: (http://www.crochetme.com/forums/t/28917.aspx
video directions: http://www.youtube.com/watch?v=WLuSVyKvoUg%29
Row 1 Consists of 28 Squares
Square 1
Round 1: Ch 3, 2 dc in circle, ch 2, *3 dc, ch 2,* repeat from * to *, sl st to beginning ch 3. (12 dc – 4 ch 2 sps) (edited to correct an error-9 AUG 2011)
Round 2: Sl st to next ch 2 sp, ch 3, (2 dc, ch 2, 3 dc) in same sp, ch 1, *(3 dc, ch 2, 3 dc) in next corner, ch 1,* repeat from * to,* sl st into beginning ch 3. (24 dc, 4 ch 1 sps, 4 ch 2 sps)
Round 3: Sl st to next ch 2 sp, ch 3,( 2 dc, ch 2, 3 dc) in same sp, ch 1, *3 dc in next ch 1 sp, ch 1 *(3 dc, ch 2, 3 dc) in next corner, ch 1,* repeat from * to,* sl st to beginning ch 3. (36 dc, 8 ch 1 sps, 4 ch 2 sps) Fasten Off
Squares 2-28
Rounds 1-2 Repeat Rounds 1 and 2 above
Round 3: follow the steps below . . photos referenced are directly underneath.
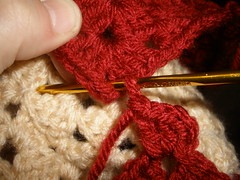
- Sl st to next ch 2 sp, ch 3, 2 dc, ch 1, sl st through corner ch 2 of the previous square (Photo 1),
- grabbing yarn for 2nd ch in ch 2 corner,
- continue with 3 dc into the corner sp on the square you are joining now your hook goes through the ch 1 space in the original square and ch 1 (Photo 2),
- 3 dc in next ch 1 sp on the square you are joining. Repeat to corner. (Photo 3)
- Make 3 dc in the corner of the square you are working on, ch 1, sl st through corner ch 2 on the other square (Photo 4)
- ch 1, 3 dc in same sp, ch 1, *3 dc in next ch 1 sp, ch 1 *(3 dc, ch 2, 3 dc) in next corner, ch 1,* repeat from * to,* sl st to beginning ch 3. (36 dc, 8 ch 1 sps, 4 ch 2 sps) Fasten Off
 |
| Photo 1 |
 |
| Photo 2 |
 |
| Photo 3 NOTICE: 3 dc have been made in the corner of the square you are joining. |
 |
| Photo 4 NOTICE: I have 3 dc in the square I am joining, there is a sl st in the original square |
Row 2 consists of 28 squares.
Do Rounds 1 - 3 above for squares 2 - 28.
Do Rounds 1 - 3 above for squares 2 - 28.
Square 2
Rounds 1 - 2: Repeat Rounds 1 and 2 above.
Round 3: Steps 1 - 5 are identical to the last 29 squares you have made
- Sl st to next ch 2 sp, ch 3, 2 dc, ch 1, sl st through corner ch 2 of the previous square (Photo 1),
- grabbing yarn for 2nd ch in ch 2 corner,
- continue with 3 dc into the corner sp on the square you are joining now your hook goes through the ch 1 space in the original square and ch 1 (Photo 2),
- 3 dc in next ch 1 sp on the square you are joining. Repeat to corner. (Photo 3)
- make 3 dc in the corner of the square you are working on, ch 1, sl st through corner ch 2 on the other square (Photo 4)
the 2nd ch in the corner goes through the original square that will be joined to the 2nd side of the square you are making.- Once the 2nd ch is complete, do your 3 dc in the corner of the square you are working on.
To finish this side, join the same way as you did the 1st side.
FInish the last 2 sides ,as you would a regular granny square.
|
| Photo 5 This is identical to photo 4 NOTICE at the top of the photo is the ch 2 sp of the 2nd square on Row 1? This ch 2 sp is where your 2nd sl st will go. |
BORDER:
Round 1: Join color in a corner with a sl st, ch 1, sc in same sp, ch 2, sc in same sp ch 1, sk 1, *sc in next, ch 1, sk1, * Repeat from * to * around making the corners (sc, ch 2, ,sc) in the ch 2 sp of the end squares. Sl st to the begining sl st, Fasten off.
Rounds 2 - 6: Repeat Round 1. Fasten off at the end of Round 6.
- You will do a set of 4 Rows in each color in sequence A - F, then repeat until you have reached the circumference (length) you desire (See Chart at the end of the pattern.) once you have done the 1st color.
- The number of stitches you make in each ROW will depend on the size hat you are making. (Again, see Chart at the end of the pattern.)
Row 1: Sc in 2nd ch from the hook and in each ch until you are 5 ch from the beginning, Ch 1, turn.
Row 2: Sc in each st to the end, ch 1, turn.
Row 3: Sc in each st, including the 5 remaining chain sts, Join Color B, fasten off A.
Color B:
Row 1: Sc in each st to the end, ch 1, turn.
Row 2: Sc in each st until you are 5 sts from the beginning, Ch 1, turn.
Row 3: Sc in each st to the end, ch 1, turn.
Row 4: Sc in each st, including the 5 remaining chain sts, Join Color C, fasten off Color B.
Repeat Color B Rows 1-4 for each color. When you have reached the circumference (width) you need, fasten off.
BORDER
Row 1: Join Color A to the last row the "normal" end on the right side of the hat. Ch1, sc in the same st, *ch 1, sk 1 row, sc in the next row,* Repeat from * to * across. Join Color B, ch 1, turn. (Fasten off Color A)
Row 2: Sc in same sp and ch 1 sp, *ch 1, sk 1, sc in next sp,* repeat from * to * across ending with a sc in the last st. Join Color C, ch 1,turn. (Fasten off Color B)
Row 3: Sc in same sp, *ch 1, sk 1, sc in next sp,* repeat from * to * across. Join Color D, ch 1, turn. (Fasten off Color C)
Row 4: Repeat Row 2. At the end of the row, join Color E.(Fasten off Color D)
Row 5: Repeat Row 3. At end of the row, join Color F. (Fasten off Color E)
Row 6: Repeat Row 2. At the end, fasten off, do not join any new colors.j
JOINING
With wrong sides together, sl st to join the ends of Row 6 with the last color you used, sc in the same st and each st to the top, Fasten off.
Make a Pom-Pom using all the colors in the hat. Attach securly to the top of the hat.

Measurements For Hats
Head Circumference
|
Hat Height
|
Circumference
|
Baby - 3 to 6 months
|
14" - 17 "
|
7"
|
Baby - 6 to 12 months
|
16" - 19 "
|
7.5"
|
Toddler - preschooler (12 months - 3 years)
|
18" to 20 "
|
8"
|
Child (3 - 10 years)
|
8.5"
|
19" - 20 1/2"
|
Pre-teens and Teens Hat
|
9-10"
|
20 1/2" - 22"
|
Adult Woman
|
11"
|
21.5" - 22.5"
|
Adult Man
|
11"-11.5"
|
23" - 24"
|