


Moi? Her favorite aunt . . . and s-h-h-h-h-h, don't tell anyone, I am her only aunt. Now, if we go to aunts and great-aunts she has my Aunt Ruth . . . and she deserves to be the favorite. She is the matriarch of our family.
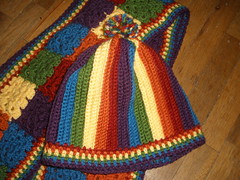
But, I digress . . . here is what the scarf and hat ended up looking like. I like them a lot, but I am going to replace the pom-pom with a bigger one. This one is out of proportion . . but I wanted the picture so you get what I had.
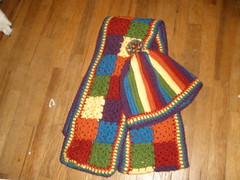
Scarf
Square Size: 3" x 3"
Border depth: 1"
Materials
Yarn: Worsted Weight
Vanna's Choice colors used in sample:
A. Scarlet
B. Terracotta
C. Duckie (Vanna Baby Yarn)
D. Kelly Green
E. Sapphire
F. Eggplant
Crochet Hook: F/5 3.75mm
Tapestry/Yarn Needle
NOTES:
- Each row is made of twenty-eight squares.
- Once the 1st square is complete, the next squares are joined as you go.
- When making the second row, the 1st square will be joined to the first square of the first row.
- The 2nd square in the second row will be joined to the 1st square in that row AND the 2nd square of the first row.
- The method I am going to teach you allows you to join the granny squares as you make them . . . no waiting until you have all of the squares done to join them.
- Your squares are done in sequence: A-F then repeat until you have reached the length you want. I made 28 squares per row but you may increase or decrease at your will.
Abbreviations
ch(s) – chain(s)
dc(s) – double crochet(s)
PU – Pick Up
sl st(s) – slip stitch(es)
sp(s) – space(s)
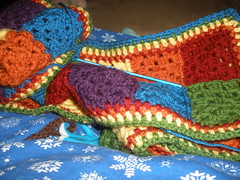
 |
| Starting the 4th round (blue) of the border. |
written directions: (http://www.crochetme.com/forums/t/28917.aspx
video directions: http://www.youtube.com/watch?v=WLuSVyKvoUg%29
Row 1 Consists of 28 Squares
Square 1
Round 1: Ch 3, 2 dc in circle, ch 2, *3 dc, ch 2,* repeat from * to *, sl st to beginning ch 3. (12 dc – 4 ch 2 sps) (edited to correct an error-9 AUG 2011)
Round 2: Sl st to next ch 2 sp, ch 3, (2 dc, ch 2, 3 dc) in same sp, ch 1, *(3 dc, ch 2, 3 dc) in next corner, ch 1,* repeat from * to,* sl st into beginning ch 3. (24 dc, 4 ch 1 sps, 4 ch 2 sps)
Round 3: Sl st to next ch 2 sp, ch 3,( 2 dc, ch 2, 3 dc) in same sp, ch 1, *3 dc in next ch 1 sp, ch 1 *(3 dc, ch 2, 3 dc) in next corner, ch 1,* repeat from * to,* sl st to beginning ch 3. (36 dc, 8 ch 1 sps, 4 ch 2 sps) Fasten Off
Squares 2-28
Rounds 1-2 Repeat Rounds 1 and 2 above
Round 3: follow the steps below . . photos referenced are directly underneath.
- Sl st to next ch 2 sp, ch 3, 2 dc, ch 1, sl st through corner ch 2 of the previous square (Photo 1),
- grabbing yarn for 2nd ch in ch 2 corner,
- continue with 3 dc into the corner sp on the square you are joining now your hook goes through the ch 1 space in the original square and ch 1 (Photo 2),
- 3 dc in next ch 1 sp on the square you are joining. Repeat to corner. (Photo 3)
- Make 3 dc in the corner of the square you are working on, ch 1, sl st through corner ch 2 on the other square (Photo 4)
- ch 1, 3 dc in same sp, ch 1, *3 dc in next ch 1 sp, ch 1 *(3 dc, ch 2, 3 dc) in next corner, ch 1,* repeat from * to,* sl st to beginning ch 3. (36 dc, 8 ch 1 sps, 4 ch 2 sps) Fasten Off
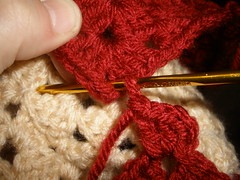 |
| Photo 1 |
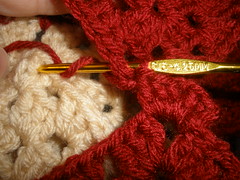 |
| Photo 2 |
 |
| Photo 3 NOTICE: 3 dc have been made in the corner of the square you are joining. |
 |
| Photo 4 NOTICE: I have 3 dc in the square I am joining, there is a sl st in the original square |
Row 2 consists of 28 squares.
Do Rounds 1 - 3 above for squares 2 - 28.
Do Rounds 1 - 3 above for squares 2 - 28.
Square 2
Rounds 1 - 2: Repeat Rounds 1 and 2 above.
Round 3: Steps 1 - 5 are identical to the last 29 squares you have made
- Sl st to next ch 2 sp, ch 3, 2 dc, ch 1, sl st through corner ch 2 of the previous square (Photo 1),
- grabbing yarn for 2nd ch in ch 2 corner,
- continue with 3 dc into the corner sp on the square you are joining now your hook goes through the ch 1 space in the original square and ch 1 (Photo 2),
- 3 dc in next ch 1 sp on the square you are joining. Repeat to corner. (Photo 3)
- make 3 dc in the corner of the square you are working on, ch 1, sl st through corner ch 2 on the other square (Photo 4)
the 2nd ch in the corner goes through the original square that will be joined to the 2nd side of the square you are making.- Once the 2nd ch is complete, do your 3 dc in the corner of the square you are working on.
To finish this side, join the same way as you did the 1st side.
FInish the last 2 sides ,as you would a regular granny square.
|
| Photo 5 This is identical to photo 4 NOTICE at the top of the photo is the ch 2 sp of the 2nd square on Row 1? This ch 2 sp is where your 2nd sl st will go. |
BORDER:
Round 1: Join color in a corner with a sl st, ch 1, sc in same sp, ch 2, sc in same sp ch 1, sk 1, *sc in next, ch 1, sk1, * Repeat from * to * around making the corners (sc, ch 2, ,sc) in the ch 2 sp of the end squares. Sl st to the begining sl st, Fasten off.
Rounds 2 - 6: Repeat Round 1. Fasten off at the end of Round 6.
- You will do a set of 4 Rows in each color in sequence A - F, then repeat until you have reached the circumference (length) you desire (See Chart at the end of the pattern.) once you have done the 1st color.
- The number of stitches you make in each ROW will depend on the size hat you are making. (Again, see Chart at the end of the pattern.)
Row 1: Sc in 2nd ch from the hook and in each ch until you are 5 ch from the beginning, Ch 1, turn.
Row 2: Sc in each st to the end, ch 1, turn.
Row 3: Sc in each st, including the 5 remaining chain sts, Join Color B, fasten off A.
Color B:
Row 1: Sc in each st to the end, ch 1, turn.
Row 2: Sc in each st until you are 5 sts from the beginning, Ch 1, turn.
Row 3: Sc in each st to the end, ch 1, turn.
Row 4: Sc in each st, including the 5 remaining chain sts, Join Color C, fasten off Color B.
Repeat Color B Rows 1-4 for each color. When you have reached the circumference (width) you need, fasten off.
BORDER
Row 1: Join Color A to the last row the "normal" end on the right side of the hat. Ch1, sc in the same st, *ch 1, sk 1 row, sc in the next row,* Repeat from * to * across. Join Color B, ch 1, turn. (Fasten off Color A)
Row 2: Sc in same sp and ch 1 sp, *ch 1, sk 1, sc in next sp,* repeat from * to * across ending with a sc in the last st. Join Color C, ch 1,turn. (Fasten off Color B)
Row 3: Sc in same sp, *ch 1, sk 1, sc in next sp,* repeat from * to * across. Join Color D, ch 1, turn. (Fasten off Color C)
Row 4: Repeat Row 2. At the end of the row, join Color E.(Fasten off Color D)
Row 5: Repeat Row 3. At end of the row, join Color F. (Fasten off Color E)
Row 6: Repeat Row 2. At the end, fasten off, do not join any new colors.j
JOINING
With wrong sides together, sl st to join the ends of Row 6 with the last color you used, sc in the same st and each st to the top, Fasten off.
Make a Pom-Pom using all the colors in the hat. Attach securly to the top of the hat.

Measurements For Hats
Head Circumference
|
Hat Height
|
Circumference
|
Baby - 3 to 6 months
|
14" - 17 "
|
7"
|
Baby - 6 to 12 months
|
16" - 19 "
|
7.5"
|
Toddler - preschooler (12 months - 3 years)
|
18" to 20 "
|
8"
|
Child (3 - 10 years)
|
8.5"
|
19" - 20 1/2"
|
Pre-teens and Teens Hat
|
9-10"
|
20 1/2" - 22"
|
Adult Woman
|
11"
|
21.5" - 22.5"
|
Adult Man
|
11"-11.5"
|
23" - 24"
|

Thanks a bunch for your patterns! I love them so! The colors you chose look fab! So beautiful work!!!
ReplyDeleteGreat day to you! xo
Love the hat and scarf, but there is an error in the pattern. Square 1 Round 1, in between the *'s you have *3 dc, 2 dc*. Shouldn't the 2 dc be 2 ch?
ReplyDeleteThe error inRound 21 of the 1st square was corrcted . . 9 AUG 2011.
ReplyDeleteThanks TJC! I oweyo o:0}