


It's done. The "Cliffs Notes" version of the pattern. If you never used Cliffs Notes, you have no idea what I mean. Cliffs Notes were a detailed summary of great works of Literature . . at least the ones I saw were. So, if you are still with me, this pattern is the Cliffs Notes version of what I made. They are the notes I jotted down as I was making the potholder.
If you are a beginner in crochet, you might have some trouble "filling in the blanks" that are here. By blanks, here I go again . . ., I mean that when people crochet, sometimes they automatically do something and figure everyone else knows what they did . . . no need to write it out.
If you want to try the pattern and need help. due to my "note taking ability" write to:
Cliffs Notes
Corporate Headquarters
"How Did We EVER Get Hooked Up With This Woman"
Hoboken, NJ . . USA
ROFLMAO @ my sense of humor.
No, really, contact me and I will gladly help you.
Okay, here we go . . .
Fingers, eyes, toes, legs and arms crossed that this time the pattern will work.
Materials
Peaches & Cream:
Gingerbread: “Army Tan”
Wreath: “Christmas Green”
Sugar n' Cream
“Red” and “White”
Crochet Hook: G
Tapestry /Yarn Needle
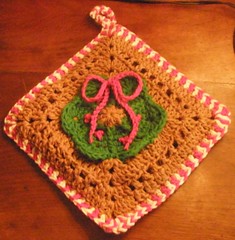
Wreath Square
Rnd 1: With Gingerbread, make a Magic Circle/Magic Loop/Adjustable Circle, 11 dc into center, pull at to close center, fasten off and weave in ends. (12 dc)
Rnd 2: Join wreath color with a sc in any dc, and the following dc *fpsc around the same dc, sc in next dc* repeat from * to * around, sl st to join, ch 1. (18 sc)
You should notice that you now have 6 sections on your wreath. No Matter What happens to your stitch count, you will mqke a fpsc around the fpsc of the rnd before.
Rnd 3: In this round you will need 3 sc between your fpsc, sl st to join, ch 1.
Rnd 4: In this round you will need 4 sc between your fpsc, sl st to join, ch 1.
Rnd 5: In this round you will need 5 sc between your fpsc, sl st to join, ch 1.
Rnd 6: In this round you will need 6 sc between your fpsc, sl st to join, ch 1.
Rnd 7: fpsc around fpsc of last round, between these you will make a shell in the 3rd dc with 7 dc's. (6 dc shells and 6 fpsc.)
The group of chains, in round 8, will allow you too build your square out of a 6 section circle. You may need to use more chains between the scs or less. I found that 7 was what worked for me . . . fewer and the wreath buckled in on itself. More, and the square didn't fit well behind the wreath.
Rnd 8: *Sc in the 1st dc of any shell, ch 7, sc in 7th dc,* repeat from * to * around, sl st to join and fasten off.
Square
Rnd 1: Join Gingerbread, with a sl st, between any 2 scs, in this space (ch 3, 2 dc, ch 2, 3 dc), //in the 1st ch 7 do the following (2 dc, 2 hdc, 2 sc), sc between the 2 sc in the previous round, in the 2nd ch 7 ( 2 sc, 2 dc, ch 1, 2 dc, 2 sc), sc between the 2 sc in the previous round,in the 3rd ch 7 (3 sc, 2 dc), in the space between the 2 sc in the previous round (2 dc, ch 2, 2 dc), // repeat from // to // around ending with the 3rd ch 7 info, sl st to join, sl st to corner ch 2, ch 3.
WOW . . .that's done. I sure hope I made sense . . you should now have 4 corners and 4 sides . . .hopefully you have the same number of sts on all sides.
Rnd 2: 2 dc in corner sp, with the following in the same sp (ch 2, 2 dc), ch 1, *sk 1, dc in next st , ch 1* repeat * to * to corner, in corner sp // (2 dc, ch 2, 2 dc), ch 1, *sk 1, dc in next st , ch 1* repeat * to * to corner,// repeat from // to // around, sl st to ch 3 to join, sl st to corner sp, ch 3.
Rnd 3: Dc in same sp, ch 2, 2 dc in same sp, dc in each sp to next corner, *in corner sp (2 dc, ch 2, 2 dc), dc in each sp to next corner,* repeat from * to * around, sl st to join, fasten off.
You may make your square larger, this just happened to be the size I wanted.
The back is a 7 round granny square made out of Gingerbread.
NOTES before Joining Instructions
- To Join you will be alternating red and white as you dc both sides together
- when the yarn gets tangled up . . . which I am sure yours will . . remove your hook, hold the yarn (from the skein end) and let the potholders spin itself so the yarn is untangled.
- IF you want to get REAL creative and make a red, green and white candy cane you should do this . . or drive yourself nuts . .
- cut 3 yarnds of each color . . . if yarn tangles, you can easily untangle it . . .
- then join another 3 yard section when needed.
Joining Multiple colors in Dcs titches.
- When using two (or more) colors in dc you make the dcs the same as normal BUT
- on the last yo, pick up the next color to finish the stitch.
- Then use that color to make the next dc EXCEPT
- on the last yo, pick up the new color to finish the stitch.
- This makes your dcs look perfect.
HANGER
This will be made in the corner opposite your beginning corner. After your 3dc you will make a ch of 20 (alternating color), sc in the 2nd ch from hook and sc in each ch to the base (again, alternate colors to match the ch color), sl st to base and continue with the remaining 3 dc in the corner and complete the rest of the border.
This will be made in the corner opposite your beginning corner. After your 3dc you will make a ch of 20 (alternating color), sc in the 2nd ch from hook and sc in each ch to the base (again, alternate colors to match the ch color), sl st to base and continue with the remaining 3 dc in the corner and complete the rest of the border.
JOINING . . . wrong sides together matching corners
- Join red in any corner and (ch 3, in same white dc, red dc, white ch 1, red ch 1, white ch 1 then white dc, red dc, white dc),
- alternate red and white dc across to the next corner,
- *with the proper colors make 3 dc, 3 chs, 3 dc, alternate red and white dc across to the next corner,
- * repeat from * to * around, sl st to join fasten off.
Bow: Ch 65 and fasten off. Pull chain through last fpsc. on the wreath, under your hanger. Tie into bow.
Hope you enjoy this pattern. Please let me know off any problems and I shall fix them for others use.

So lovely! Great idea for Christmas!!! Thanks for sharing the pattern, hope I could try it soon!
ReplyDeleteThis is adorable, but could you put a picture in the *.pdf file so we can see what it looks like with the pattern, please? (I have a tendency to forget what a particular pattern looked like, especially if I file it away & don't pick up the pattern until a few years down the road.) Thanks in advance!
ReplyDeleteOH! You are a hoot! That was the most fun I've had reading a pattern in my life. I loved your comments. I can see why this would be hard for a beginner but it is a lovely project!
ReplyDeleteLeandra
I love it! Anyone would want this for Christmas!! Thank you.
ReplyDeleteFor ANONYMOUS . . .
ReplyDeleteIf you want the picture you will need to cut and paste the pattern. DO you know how to do that? If not, leave me a comment with an email and I will explain it to you.
The Joli Print (PDFdoesn't do the pictures :0{
But, you could print the PDF then go b ack to the page and highlight the picture and print it on the back of the 1st page of the ODF,