


This pattern was originally published October 10, 2008


Molly's hat is a pattern that I designed to go with a sweater that I had made. I needed something that would incorporate a color called "seashore" with white. This made me be creative.
The ensemble will be sent to Pine Ridge Indian Reservation to be given to a newborn baby at the Indian Health Services OB Ward.

Row 4: sc in back loop of the last stitch on Row 3. Continue until the end of the row. Ch 1, turn.
Row 5 & 6: Repeat Row 2 twice.
Row 7 & 8: Repeat rows 2 & 3.
You should now have the following: [see photo below]
Chain & Row 1 : No loopy at end
Rows 2 & 3: Loopy at the end
Rows 5 & 6: No Loopy
Rows 7 & 8: Loopy at the end

Repeat Rows 5, 6, 7 & 8 until you have reached the width you want.
Finishing:
1. Join the sides so that you will end up with your yarn at the Loopy side of the hat.
2. Cut the yarn at a length of 12 “ (or more if you feel you need it for step 3.)
3. Thread yarn into a yarn needle and weave through the hat at the bottom of each loopy.
4. If you don’t like this technique, just weave your hook through the hat at the bottom of each loopy. (Make sure your hook end is at the start of the loopies.)
5. Pull yarn as tight as you can. Finish off.
If the opening at the top of the hat does not completely close,
Thread another yarn needle with more yarn and on the underside of the hat at the top, sew the opening together.
Variations:
Two colored Loopies1. Before weaving yarn through to close the top, join different colored yarn at the end of the first row without a loopy.
2. Ch 25 (or whatever you chained) sc to base of loopy.
3. Sc at the end of next set of empty rows.
4. Repeat steps 2 & 3 until you reach the end.
5. Follow steps 1 – 5 in Finishing directions.
Various height Loopies
Make every other loopy a different length. Ch 20 and ch 30 are what I usually use.
Two colored Loopies of various heightsMake your second color loopies a smaller chain.
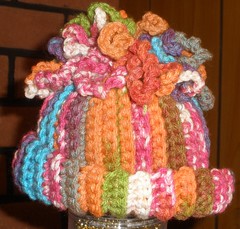
To get the "loopies" that look core like curls, before you attach the last chain of the loopy to the hat, twist the loopy . . the more twist, the tighter the curl.
Please let me know if you discover an error.
If you decide to copy this pattern, all I ask is that you leave a comment for me and then send a copy of your finished project so that I may post the different looks that have been created.
http://thefurbabiesmomma.blogspot.com/ ©2008 Paula Gaumer Tooke thefurbabiesmomma@gmail.com
Reproducing or transmitting this pattern by any means for any purpose other than personal or charity use constitutes a violation of copyright law. Direct linking to a pattern or recipe is allowed.
Crocheting hands are not snacking hands~
(318)

I am still working on the pattern. I should have it posted before the end of October.
I will try to include a photo of the whole ensemble. You will see how I paired with "Molly" to make her afghan and booties a complete ensemble. I made a sweater and hat to go with them.
The ensemble will be sent to Pine Ridge Indian Reservation to be given to a newborn baby at the Indian Health Services OB Ward.
MOLLY'S HATCrochet Hook - G
Yarn: Any type or weight form Baby Yarn on up to Bulky.
Hook: appropriate hook for yarn weight
Yarn Needle
The width and heath of this pattern depends on the size you are making. Therefore, refer to this chart at Bev’s Country Cottage to find the measurements you need.
Make a chain 3 links longer than you need for the length.
Row 1: sc in third ch from the end, sc in each stitch to the end of the row. Ch 1, turn.
Row 2: sc in back loop of each stitch to the end.
Row 3: sc in back loop of each stitch to the end. Now chain the number of links you need for the loopy. (I normally chain 25 – 30 since I like mine long and sloppy.) [see photo below]
Row 4: sc in back loop of the last stitch on Row 3. Continue until the end of the row. Ch 1, turn.
Row 5 & 6: Repeat Row 2 twice.
Row 7 & 8: Repeat rows 2 & 3.
You should now have the following: [see photo below]
Chain & Row 1 : No loopy at end
Rows 2 & 3: Loopy at the end
Rows 5 & 6: No Loopy
Rows 7 & 8: Loopy at the end
Repeat Rows 5, 6, 7 & 8 until you have reached the width you want.
Finishing:
1. Join the sides so that you will end up with your yarn at the Loopy side of the hat.
2. Cut the yarn at a length of 12 “ (or more if you feel you need it for step 3.)
3. Thread yarn into a yarn needle and weave through the hat at the bottom of each loopy.
4. If you don’t like this technique, just weave your hook through the hat at the bottom of each loopy. (Make sure your hook end is at the start of the loopies.)
5. Pull yarn as tight as you can. Finish off.
If the opening at the top of the hat does not completely close,
Thread another yarn needle with more yarn and on the underside of the hat at the top, sew the opening together.
Variations:
Two colored Loopies1. Before weaving yarn through to close the top, join different colored yarn at the end of the first row without a loopy.
2. Ch 25 (or whatever you chained) sc to base of loopy.
3. Sc at the end of next set of empty rows.
4. Repeat steps 2 & 3 until you reach the end.
5. Follow steps 1 – 5 in Finishing directions.
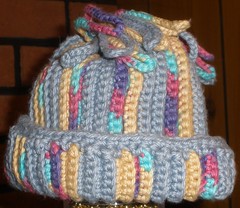
Various height Loopies
Make every other loopy a different length. Ch 20 and ch 30 are what I usually use.
Two colored Loopies of various heightsMake your second color loopies a smaller chain.
To get the "loopies" that look core like curls, before you attach the last chain of the loopy to the hat, twist the loopy . . the more twist, the tighter the curl.
Please let me know if you discover an error.
http://thefurbabiesmomma.blogspot.com/ ©2008 Paula Gaumer Tooke thefurbabiesmomma@gmail.com
Reproducing or transmitting this pattern by any means for any purpose other than personal or charity use constitutes a violation of copyright law. Direct linking to a pattern or recipe is allowed.
Crocheting hands are not snacking hands~
(318)


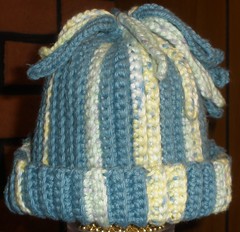
And, an adult version.


No comments:
Post a Comment
Thank you for taking the time to comment on this post.